NOTE: Python 3.11.9 and FastAPI 0.111.0 is used throughout this article.
Creating middleware within FastAPI framework is really simple: you just create a regular handler with extra call_next parameter and decorate it with @app.middleware("http").
Then you make sure to invoke rest of the processing chain by calling await call_next(request) and return response and the very end.
On the other hand, when it comes to something more complex like transforming existing body or modifying immutable headers, it’s not that straightforward to do.
Usage of such a middleware is still simple, so in case you want to add automatic redirect to https endpoints you can use provided HTTPSRedirectMiddleware one:
1 2 3
app = FastAPI()
app.add_middleware(HTTPSRedirectMiddleware)
But writing your own sophisticated middleware is a bit trickier.
Modifying request body
Let’s imagine that we want to strip all the whitespace characters within the payload body we send to our server. First we would create a simple helper function which recursively modifies input data in place.
1 2 3 4 5 6 7 8 9
defstrip_whitespace(data: Any) -> Any: ifisinstance(data, str): return data.strip() elifisinstance(data, dict): return {k: strip_whitespace(v) for k, v in data.items()} elifisinstance(data, list): return [strip_whitespace(item) for item in data]
return data
Just to be clear: you should use Pydantic models in order to coerce/validate the data you pass to the handlers, so this is just an illustrative example here.
To define middleware you need to create a class that accepts ASGI app and make it callable by implementing async def __call__(self, scope: Scope, receive: Receive, send: Send) method
and then transform it using previously implemented helper function. All of the downstreamed middleware alongside with route handlers will receive request containing our adjusted payload.
Modifying response body
Now let’s check even more complex middleware where we need to both modify response body and adjust response headers accordingly to the changes made.
We start by defining a similar middleware class which accepts app and has __call__ method on it
First, we preserve the initial message and wait for the response.body message to come. Then we load json body the same way we did before and do any tranformation required. In the example above we wrap response into the nested stucture that count total elements in case of an array and add total property to it. The list itself is returned under the items property.
After that, we create headers structure that is allowed to be mutated and change Content-Length header to reflect that our data have been updated.
Finally, we send initial saved response.start part and our modified body back to the client (or to the any other middleware down the line).
To make sure that transformation are a part of request/response cycle we need to install it on the app.
As you can see we received data back wrapped into object with extra information and all of the values were subjects of leading/trailing whitespace removal.
At this point you should be able to implement any of the middleware logic in your app using the approach described. But before trying to invent anything, check this repository which contains a lot of useful middleware, so you can cover most of the daily web-realted use cases.
]]><blockquote>
<p><strong>NOTE</strong>: Python <code>3.11.9</code> and FastAPI <code>0.111.0</code> is used throughout this article.</p>
</blhapless. Easily run and manage background processeshttps://bmwant.link/hapless-easily-run-and-manage-background-processes/2022-11-13T10:52:38.000Z2024-05-08T13:39:43.823ZIn the previous article we’ve talked about running and tracking processes in the background with the tools that Linux provides. Fortunately, there is a much easier and convenient way to do that using hapless package. This is a Python project I’ve been recently working on and you can install it using pip like this
1
$ pip install --upgrade hapless
The only thing you need to add is a short prefix hap run to a command you want to run in the background
1 2
$ hap run ./my_long_running_script.sh $ hap run python another_script.py --with-flags --and-arguments=true
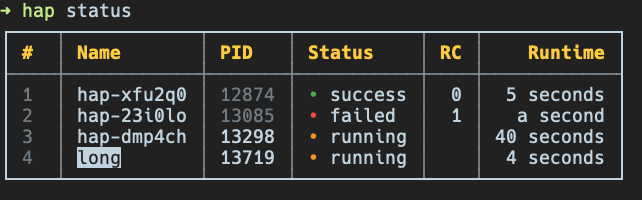
It will automatically handle output redirection and detach process from current shell, so it is safe to launch it within remote ssh session, close the connection and return back in a while. To retrieve status of the processes and get list of all the tracked ones simply type
1 2 3
$ hap # or $ hap status
On a creation it will also generate unique id for each process started, but you can also provide your own alias using -n/--name flag to refer the process later
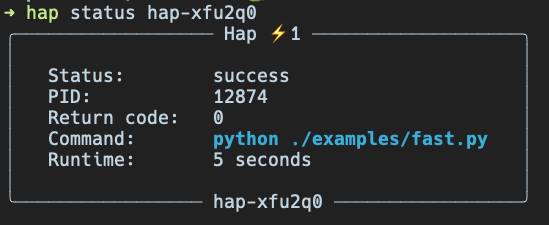
Besides that you can specify process by providing its sequential number, so all the invocations below are valid
1 2 3
$ hap status 1 # just a number from the first column $ hap status hap-23i0lo # automatically generated ID $ hap status long # any custom name you provided when launching with -n flag
There is also a -v/--verbose flag for the status/show command, so you can get detailed information about the process including complete environment and paths to output files.
Options available
Next thing you usually want to do is to check an output for the process (both stdout and stderr is possible). Keep in mind that you can refer to process the same way as above
1 2 3
$ hap logs hap-dmp4ch # show stdout $ hap logs -f 2 # follow logs, similar to `tail -f` $ hap logs --stderr long # print stderr for the process named long
Another useful feature is the ability to pause execution of the process and resume it at any point
1 2 3 4
$ hap pause hap-23i0lo $ hap suspend hap-23i0lo # same as above # resume execution $ hap resume hap-23i0lo
Moreover, you can send any arbitrary signal to the process through hapless
1 2
$ hap signal hap-23i0lo 9 # sends SIGKILL $ hap signal hap-xfu2q0 15 # sends SIGTERM
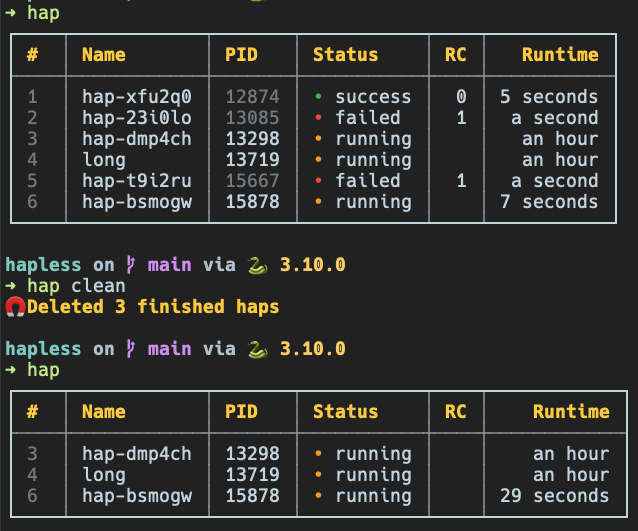
Cleanup
hapless stores information about processes internally and preserves data upon completion, so if you don’t care about finished processes you might want to invoke hap clean which will leave only ongoing ones (note that in the summary table the PID of the finished processes is dimmed as those do not exist anymore).
That’s almost it as the main idea is to make launch command as easy as possible and have a convenient way to quickly check status of processes started (simply hap). For the rest of options available invoke hap --help or check the link below for the documentation.
]]><p>In the <a href="/run-processes-in-background/" title="null">previous article</a> we’ve talked about running and tracking processes in theDeprecation of package extrashttps://bmwant.link/deprecation-of-package-extras/2022-09-23T11:45:27.000Z2024-05-08T13:39:43.823ZIt’s a common case for the package to rely on extras syntax to optionally install packages which are not required for the main functionality. For example, pip install 'black[jupyter]' allows you to use black formatting utility with your Jupyter notebooks, but otherwise there is no need to bring new dependencies into your virtual environment especially if they are heavy to install.
With that premise sometimes you want to either completely deprecate extras or refactor them into a different name. As an aware package maintainer you should release an intermediate version with the warning about deprecation. That’s the case where you might want to consider adding package-extras package. It’s a simple hack that allows you to emit a warning only when package has been installed through extras syntax invocation.
How to use useless package
First step is to update your project’s configuration file pyproject.toml and add package-extras into the section we want to deprecate (databases in the example below).
1 2 3 4 5 6 7 8 9
[tool.poetry.dependencies] package-extras = { version = "^0.2.0", optional = true } # your actual extras below psycopg2 = { version = "^2.9", optional = true } mysqlclient = { version = "^1.3", optional = true }
[tool.poetry.extras] # append our package to the list databases = ["package-extras", "mysqlclient", "psycopg2"]
Same example as above, but for the case when you still maintain setup.py file for your project.
install_requires = [ # list of your main dependencies ]
extras_require = { 'databases': [ 'psycopg2>=2.9,<3.0', 'mysqlclient>=1.3,<2.0', # append our package to the list 'package-extras>=0.2.0,<1.0.0', ] }
setup_kwargs = { # rest of the arguments 'install_requires': install_requires, 'extras_require': extras_require, 'python_requires': '>=3.8,<4.0', }
setup(**setup_kwargs)
Then add this logic to your entrypoint or top-level __init__.py file to raise deprecation warning
1 2 3 4 5 6 7 8 9 10 11 12 13 14
import warnings
try: import package_extras except ImportError: pass else: warnings.warn( "'test_package[databases]' extra is deprecated and will be " "removed in a future release. Read more in this issue: " "https://bmwant.link/deprecation-of-package-extras/", category=DeprecationWarning, stacklevel=2, )
You might wonder why don’t we just import some package from the list and make assertion based on its presence. First of all this package might be installed by some other dependency or just be present in your virtual environment. Secondly, you might end up with a huge import block in case you decided to check every package that belongs to extras (even this wouldn’t guarantee mitigation of the first case). In contrast, package_extras is definitely present in the environment only if you have invoked installation using extra syntax, so this approach is the most resillient one.
Opposite scenario
There is an opposite case where you want to make sure that some extras were installed. Imagine your CI uses a lot of tools to bump version, update release notes, publish release to artifactory and upload wheel to the internal S3 bucket. You don’t need this tools neither for development, nor to be packaged by default with your project.
1 2 3 4 5 6 7 8 9
[tool.poetry.dependencies] package-extras = { version = "^0.2.0", optional = true } # your actual extras below "github3.py" = { version = "^3.2.0", optional = true }
[tool.poetry.extras] # A lot more of other dependencies here # It doesn't make sense to use this approach for one simple library ci = ["package-extras", "github3.py"]
In the same time you might rely on the cli entrypoint that invokes all the mentioned steps within its code. So this check can warn you about missing pip install test_package[ci] step or just fail fast after this step instead of having unexpected import error somewhere in the middle of your pipeline.
1 2 3 4 5 6 7 8 9 10 11
import warnings
try: import package_extras except ModuleNotFoundError: warnings.warn( "You are going to use functionality that depends on 'ci' extras. " "Please install 'test_package[ci]' to proceed.", category=ImportWarning, stacklevel=2, )
NOTE: ImportWarning warnings are disabled by default, so if you want your users to actually see the error during the import it is better to use RuntimeWarning instead. Alternatively, you can pass extra command line flag python -Walways on invocation.
]]><p>It’s a common case for the package to rely on <a href="https://peps.python.org/pep-0508/#extras">extras</a> syntax to optionally install Run processes in the backgroundhttps://bmwant.link/run-processes-in-background/2022-04-28T13:22:34.000Z2024-05-08T13:39:43.823ZSuppose you have some long running script (we’ll use Python here as an example)
1 2 3 4 5 6 7 8 9 10
import time
defmain(): for i inrange(1000): print(f"Processing {i}...", flush=True) # Actual heavy-lifting instead of sleeping time.sleep(10)
if __name__ == "__main__": main()
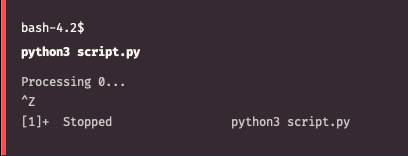
and you have launched it in active terminal session like this python script.py (or poetry run python script.py).
Suddenly you’ve realized that this is going to take couple of hours to finish and you need to either exit current shell or logout from remote instance where you have your ssh connection established. Nobody wants to lose the time and work spent and in most cases you cannot just restart a process the proper way (see options below) due to the reasons:
script is most likely not idempotent (in other words it cannot be launched multiple times producing same output results and not causing any additional side-effects)
script is not designed to be resumed, it cannot pick up from the interrupted spot
it will break consistency between your data when invoked repeteadly
let’s face it: for simple scripts you don’t generally think about all the items above and do not handle all the possible corner cases
Solution
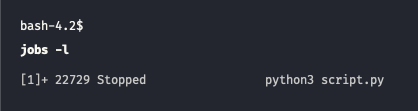
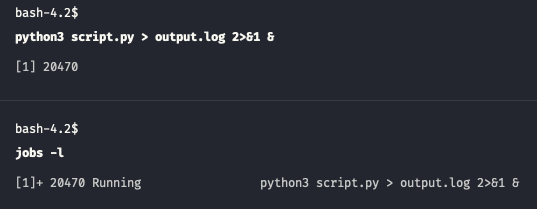
Press Ctrl-Z in active window. This will send SIGTSTP signal to your process causing it to suspend
Type jobs in the same shell. This utility will list all jobs in current session. jobs -l will also display process ID or any other information available
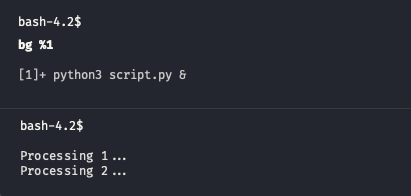
Now we can use another utility called bg to start executing this job in background. Type bg %1 to continue running our process in the background. Note how we reference a job by prefixing its number with % sign
This would be enough if you process does not produce output to the terminal. Otherwise it can mess up a screen or in case messages are produced fast enough make it impossible to work properly within the session. You can type stty tostop to make sure that job will be stopped automatially once it writes to its standard output or standard error.
In the meanwhile we will use reredirect to dynamically redirect output of an already running process.
1 2 3 4 5 6
$ git clone https://github.com/jerome-pouiller/reredirect.git $ cd redirect $ make
# skip this step if you do not have root permissions $ sudo make install
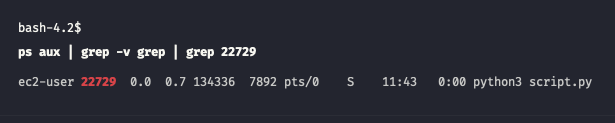
Use process identificator obtained from jobs -l and launch this command
# Run from installation directory if you do not have root permissions $ ./reredirect -m output.log 22729
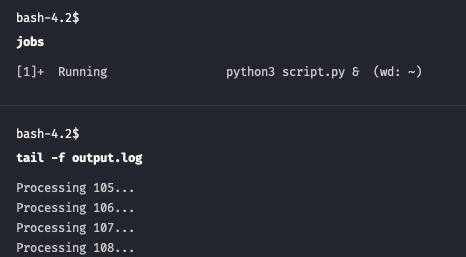
You are still able to track progress and examine output with tail command tail -f output.log
Last step in this entangled procedure is to make sure we can drop current active session without killing the process. This might be useful in case you plan to close ssh connection to the remote and then reconnect again for the updates. Shell has disown command which is designed for this purpose.
1
$ disown %1
Note that referencing is exactly the same by the job number. However after detaching the process you will not see it within jobs output as current shell does not own this process anymore. Still, PID will remain the same and you can track progress by inspecting output with tail -f output.log
Meet nohup
If you want to follow a procedure described above from the very beginning you should first make sure all the output is written to a text file (to omit all the hacks with modifying processes at a runtime)
1
$ poetry run python script.py > output.log 2>&1
In this command we redirect stdout to a output.log file and then pointing stderr to the same location where stdout goes.
Then you apply Ctrl-Z and bg trick to ensure process is running in the background. To simplify this you can initially add ampersand symbol (&) to the end of the command, so it will run as a backround process in the first place.
1
$ poetry run python script.py > output.log 2>&1 &
Note that you can always bring any process running in the background to foreground. fg does exactly this thing. Remember to refer the job by percentage sign and its number when invoking. fg %1 will send first job to the foreground and you can again bring it to the background at any time needed.
Next step would be to call disown on the job (like disown %1) to make sure we can safely close current shell session without interrupting our process. Lastly, meet nohup utility which can also help us to omit this step if we plan to launch such a long-running background process. So, final version of the invocation of your command should always look like this
This is the proper and safe way to execute process in the background and ensure it will not mess current session with its output or terminate unexpectedly when session is closed.
Use screen
There is a preferred way of running anything on the remote instance via ssh connection, so dropped connection will not affect work being done there. We can also use same tool for running background processes. First, install screen program
1 2 3 4
# Depending on the system you run $ sudo apt install -y screen # or $ sudo yum install -y screen
Next, type screen which will automatically move you into new session where you can simply run your script without any modifications
1
$ python script.py
and then detach from current screen session by typing Ctrl-A then D.
To check the list of all active screens (and you can launch as many of them as you like) type this
1
$ screen -ls
To restore back into your detached session you can type command below and check the progress and output of your command
1
$ screen -r
There is a lot more of this utility and it’s a really powerful tool to be used as a window manager / terminal multiplexer, but for the purpose of running a process in the background this should be enough. At this note I’m leaving you here with a bunch of extra links to check. Stay curious, fight for freedom 🇺🇦
]]><p>Suppose you have some long running script (we’ll use Python here as an example)</p>
<figure class="highlight python"><table><tr><td classDjango migrations create indexhttps://bmwant.link/django-migrations-create-index/2022-03-23T10:09:54.000Z2024-05-08T13:39:43.823ZSometimes you need to add an index to already existing field within the table for performance gains. However, operation of adding index locks table by default, so on production workload you cannot afford such a thing as it might cause downtime. The bigger table you have, the longer it takes to create an index resulting in table unavailability. PostgreSQL supports building indexes without locking out writes, but let’s see how Django handles this migration.
Default behaviour
Consider having this simple User model
1 2 3 4 5 6 7
from django.db import models from django.contrib.auth.models import AbstractBaseUser from django.utils import timezone
classUser(AbstractBaseUser): name = models.CharField(max_length=200) date_created = models.DateTimeField(default=timezone.now)
At some point you have decided you need efficient sort on date_created field. Following the usual workflow you update the field like this
We can check the underlying SQL code and verify that index will be created with command python manage.py sqlmigrate app 0002
1 2 3 4 5 6
BEGIN; -- -- Alter field date_created on user -- CREATE INDEX "app_user_date_created_a9e0fc3e" ON "app_user" ("date_created"); COMMIT;
Nonetheless, this is not exactly what we need as the operation is blocking and cannot be applied safely on the production environment. Surely, you can execute CREATE INDEX CONCURRENTLY directly on the database, but it’s a really bad practice to diverge code and database state when using an ORM.
Proper solution
Here’s the correct way of applying such a migration. I’ll go over most important points below
We are using SeparateDatabaseAndState operation to make sure any custom modification on the database schema (database_operations) has a corresponding change reflected within the model definition (state_operations)
We are using AddIndexConcurrently to leverage PostgreSQL feature of creating/dropping indexes without locking out writes.
We are setting atomic = False as concurrent option is not supported inside a transaction.
Note that we have no BEGIN/COMMIT section when checking underlying SQL code python manage.py sqlmigrate app 0002 (make sure to provide correct number for the migration)
1 2 3 4
-- -- Custom state/database change combination -- CREATE INDEX CONCURRENTLY "app_user_date_created_idx" ON "app_user" ("date_created");
Workaround for older Django versions
Support for concurrent index operation has been added in Django 3.0 version, so in case you are using older version for some reason here’s a way you can achieve the same thing
1 2 3 4 5 6
database_operations=[ migrations.RunSQL( 'CREATE INDEX CONCURRENTLY "app_user_date_created_idx" ON "app_user" ("date_created");', reverse_sql='DROP INDEX CONCURRENTLY "app_user_date_created_idx";', ), ]
Now the only thing left is to apply migrations the next time you deliver your code to production.
]]><p>Sometimes you need to add an index to already existing field within the table for performance gains. However, operation of adding index lInvert binary tree in Pythonhttps://bmwant.link/invert-binary-tree-in-python/2022-02-06T21:51:10.000Z2024-05-08T13:39:43.823Z
Problem
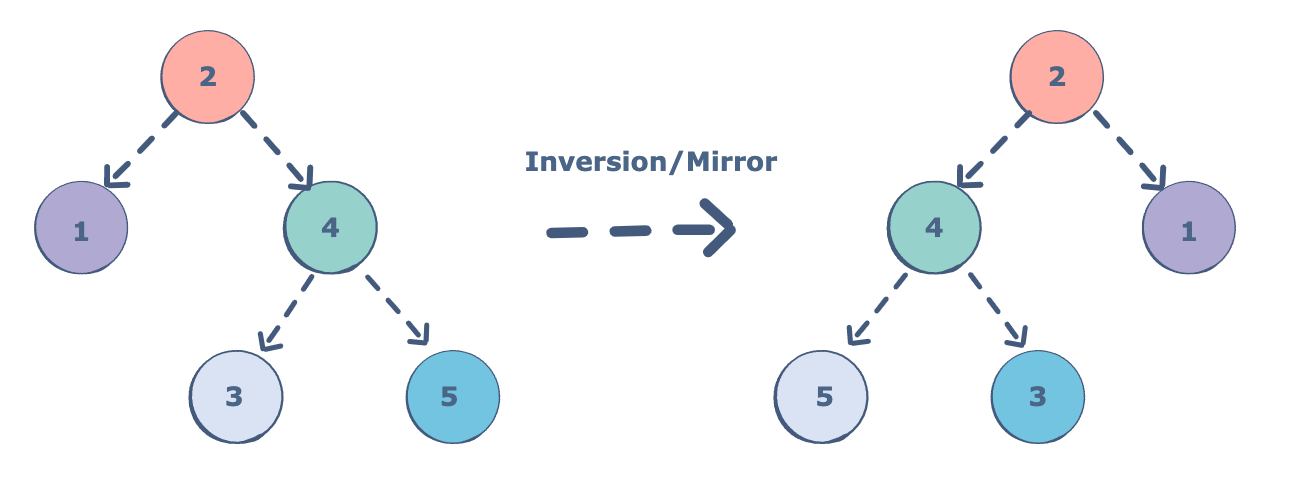
Binary tree is a data structure and one of the simplest form of trees. You might have heard about people complaining [1] that during interviews they are asked to invert a binary tree. It may sound like something difficult, but in this article I’ll show you really simple solution using recursion (see this article for more recursion in Python). Inverting a tree basically means to switch places for right and left children of each node. Resulting tree will look like vertical mirroring of the input. Therefore if you know how to represent a tree within a code, you won’t stuck adding just a couple of extra lines invoking recursive function.
NOTE: Python 3.10 is used throughout the article.
Data structures
First of all we need a data structure which represents a tree and two helper functions: generate_tree to create a target tree we plan to work with and print_tree to visualize the result and verify our solution works as intended.
To represent a tree we need to define only one class that corresponds to a node. Each node stores some value/identificator as well as pointers to its children or None in case of leaf nodes. An arbitrary variable assigned to the root node will state as a tree within our code.
1 2 3 4 5 6 7 8 9 10 11
classNode(object): def__init__(self, value: int = None): self.value = value self.left: Node = None self.right: Node = None
def__str__(self): returnf'{self.value}'
def__repr__(self) -> str: return self.__str__()
Having this class defined we can go ahead and compose some simple tree by creating couple of linked nodes.
1 2 3 4 5 6
left_leaf = Node(23) right_leaf = Node(42) root = Node(0) root.left = left_leaf root.right = right_leaf tree = root # this is our simple tree consisting of three nodes total
Storing one variable (root node) is enough to represent a whole tree as the rest of nodes are linked together using pointers.
Creating a tree manually is a hassle, so we need a function that generates arbitrary tree for us. We will provide number of levels as an argument and it will return a root node for the tree requested. Each node stores sequentually incremented value for better visual grasp, but you can also fill the tree with some random numbers.
1 2 3 4 5 6 7 8 9 10 11 12 13 14
from typing importOptional
counter = 0
defgenerate_tree(levels: int) -> Optional[Node]: global counter if levels == 0: returnNone
We leverage recursion to generate left and right subtrees until we reach leaf nodes therefore returning None for their children. To check whether generation was any good we need to add print_tree function which is going to output its target to the console.
1 2 3 4 5 6 7
defprint_tree(node: Node, level: int = 0): if node isNone: return print_tree(node.right, level+1) print(' ' * level, end='') print(node) print_tree(node.left, level+1)
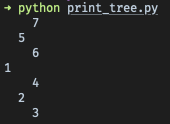
Again, idea is to use recursion for traversing left and right subtrees and putting each node’s value to the terminal in between. level parameter allows to add an extra indentation, so it’s visually clear on which level the node resides. Finally, we have a tree representation which looks like tree laying on its side (rotated counter-clockwise)
1
2
tree = generate_tree(3) print_tree(tree)
Use lines above if you want to produce same output as on the screenshot.
Recursive solution
It’s no surprise that for inverting our tree we are going to use recursion again. This simple and straightforward solution requires even less code than generation itself.
1 2 3 4 5 6 7 8 9 10
definvert_tree(node: Node) -> Node: if node isNone: return
left_inverted = invert_tree(node.left) right_inverted = invert_tree(node.right) # Switch places for left and right node.right = left_inverted node.left = right_inverted return node
The algorithm is the following: strarting from the root we invoke this function for the left and right subtrees and then swap them with each other. Therefore we end up having symmetrical tree from the same root node.
As you can see the resulting tree is symmetrical along the horizontal axis, so when folded on the dashed line corresponding nodes will match.
That’s basically it for the inversion itself. Clearly, there are more of extra code to help us represent and visualize the solution than within the solution itself. It gets tricky though when we want to accomplish the same without any recursion. Let’s move on to see how the same can be done using queue.
Non-recursive solution
NOTE: There is also a slightly simpler solution using stack data structure. We are not going to implement it within the article as internally recursive solution works by storing all the function invocations on the stack. Basically that solution is equivalent of maintaining own call stack and essentially follows the exact same principle. Anyway, you can find source code for the stack-based solution within resources section in the end of the article.
The algorithm consists of two main steps: on the first stage we use breadth first search to traverse the tree and on the way we add leaf nodes to the intermediate list; on the second stage we restore tree-like structure from list elements rearraged in the desired order. Let’s look at each stage in more detail.
First stage
This is a simple implementation of a BFS that converts our input tree to the linear array of nodes.
1 2 3 4 5 6 7 8 9 10 11 12
defflatten_tree(node: Node) -> List[Node]: flatten = [] queue = [node] while queue: node = queue.pop() if node: flatten.append(node) # Add order doesn't matter, but # it needs to be inverted on the second stage queue.insert(0, node.right) queue.insert(0, node.left) return flatten
The output of the function is a list containing all the elements in a specific order. This allows us to rebuild a tree attaching leaf nodes differently thus achieving requested order.
Second stage
To understand better what this step does consider we are working with [1, 5, 2, 7, 6, 4, 3] list as an input. You can obtain this exact order by going over our example tree from left to right column by column. Then based on the current position (counter) we look ahead and mount leaf nodes back to the current node in the queue. flatten/expand stages complement each other, so we should re-mount in the order opposite to the previous step. As a result left and right leaves for the each node got swapped.
1 2 3 4 5 6 7 8 9 10 11 12 13 14 15 16 17 18 19
defexpand_into_tree(elems: List[Node]) -> Node: queue = [] counter = 0 root = Node(elems[counter]) queue.append(root) while queue: node = queue.pop() # Note the inversed order here if left := _get(elems, counter+1): node.left = left queue.insert(0, left) counter += 1
if right := _get(elems, counter+1): node.right = right queue.insert(0, right) counter += 1
return root
There is also a helper _get function simply to make getitem operation safe for our code. It makes sure no IndexError occurs when we reach the end of our list and there is no more nodes to attach.
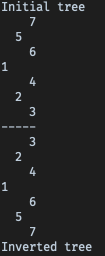
Finally, confirm the solution works properly and matches previous results:
1 2 3
tree = generate_tree(3) inverted = invert_tree_queue(tree) print_tree(inverted)
NOTE: Solution above works only with balanced trees where each non-leaf node has two children. This restriction comes up from the relying on the explicit order or the elements in the flattened tree. As an excersise you can modify the code to make it more general.
Final words
I don’t necessarily think that knowing all the algorithms and ability to write them on the whiteboard is a required thing for the programmer to have. As long as your code does something useful or cover some business need your are valuable for the field. Nowadays, especially with tools like GitHub Copilot and DeepMind AlphaCode you can write sophisticated code only by providing description of the feature required. Nevertheless, understanding main ideas and underlying concepts would hugely help you during development/debugging process. You don’t have to implement everything yourself or follow instructions step-by-step, but at least try to keep these articles as a side-reading. Stay curious, see ya.
]]><p><img src="/images/invert_binary_tree.png" alt="binary tree"></p>
<h3 id="Problem"><a href="#Problem" class="headerlink" title="Problem"><Getting started with Idris 2https://bmwant.link/getting-started-with-idris-2/2022-01-04T09:42:23.000Z2024-05-08T13:39:43.823Z
Idris is awesome functional programming language with dependent types. Version 2 is mostly backwards compatible with the previous release, but it is based on a slightly different Quantitative Type Theory[1] concept. Another major change introduced is that the language is self-hosted now.
NOTE: This tutorial is written specifically for the MacOS and was tested on Big Sur 11.6 version. Although some of the commands might apply to the different platforms, please refer to the official documentation to properly install it on other systems.
Installation
There is a dependency on Racket programming language, so make sure you have downloaded and installed it first (it’s a straightforward installation using .dmg file). Build process relies on Racket binaries, so don’t forget to make them available by adjusting your PATH variable
Now download archive with a source code (or clone latest version from Github) alongside with installing required tools and setting proper environment variables.
Optionally, you can build a documentation by invoking yet another make target and opening index.html within your browser
1 2
$ make install-libdocs $ open `idris2 --libdir`/docs/index.html
Validating installation
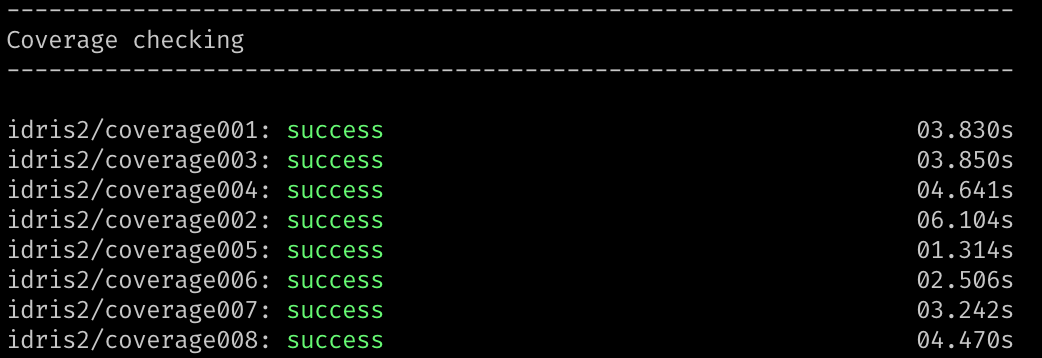
To check whether everything works properly you can launch an extensive set of unittests with the command
1
$ make test
The process might take a while and you should see a bunch of success steps on the way as well as 472/472 tests successful message in the very end
Add to PATH and install autocompletion
In order to get autocompletion edit your .zshrc file (or .bashrc for Bash users)
1 2 3
autoload -U +X compinit && compinit # remove this line for bash autoload -U +X bashcompinit && bashcompinit eval"$(idris2 --bash-completion-script idris2)"
Hello, World!
Obviously, there is no reason to install a new programming language if we are not going to write a program in it. So create a text file hello.idr and open it in your favourite text editor
1 2
main : IO () main = putStrLn "Hello, World!"
Save the file, compile the program and run the resulting executable
That’s it, check this website to get started with some basic code examples in Idris or scroll down to the resources to get to tutorials and other useful links.
]]><p><img src="/images/idris_logo.png" alt="logo"></p>
<p>Idris is awesome functional programming language with dependent types. <a href="httpTicTacToe game in Pythonhttps://bmwant.link/tictactoe-game-in-python/2021-11-18T17:36:40.000Z2024-05-08T13:39:43.827ZIntro
Computer games are a lot of fun! They are even better when written by yourself. Creating your own game gives you a wonderful journey of learning complex concepts in a playful manner. If you’ve ever wanted to develop your own game, then it’s a perfect place to begin with.
By the end of the article, you’ll be able to:
Create Tic Tac Toe Python game from a scratch
Create extensible applications which are easy to refactor
Draw graphical inteface for the game in a console
Create another GUI frontend for the game
Implement your own logic for the computer to play with human
This article assumes you have an understanding of lists, sets, and enums. A basic understanding of object-oriented Python is helpful as well. Python 3.8 is recommended and used throughout this article.
The rules of the game are pretty simple: two players Xs and Os are placing their marks on a 3 by 3 grid. In order to win the game, a player must fill a horizontal, vertical, or diagonal row with his symbol. In case no one succeeds to make a row of three a game is declared a draw. On the video you’ve seen first player managed to have three Xs on the diagonal and thus win the game.
Imagine being able to create such a game and play with your friend or with a computer opponent. Sounds pretty exiting, right? Let’s move ahead and get your hands dirty by wrinting some code.
Structure of the application
Planning is the most important thing for every project. Having clear picture in mind allows you to write your code faster, make less errors and avoid stagnation. That’s why you will go through the process of describing basic building blocks for the game, then envision complete architecture for the application and glue everything together by actually writing some code.
Setting up the board
Let’s start by defining a single cell of a board which can hold either of three states. Initially it’s an empty cell and it might also be an X or an O.
1 2 3 4 5 6
from enum import Enum # Python 3.4+
classCell(Enum): EMPTY = " " X = "X" O = "O"
On the example above you can see enumeration which is a set of members bound to unique, constant values. enum is always a great choice when you need to group a bunch of constant values together as it allows to be iterated over, compare its members, and guarantee uniqueness if needed.
Now you want to store a whole board and the easiest way to represent such a table in Python is to use list of lists. Inner lists correspond to rows of the board and outer list is just the container for them.
Game board is empty from the start, so you provide Cell.EMPTY value for each of the cells within it as in the code above.
At this point, when the basic data structures for our game are known, you can start thinking about the formation which will hold these building blocks.
Game architecture overview
It’s always good to ponder on application design before writing any code. This kind of approach allows you to clearly understand what components of the application you’ll be working on, spot and eliminate possible flaws. Program created in such a way is easy to refactor thus you’ll spend much less time writing and debugging a code.
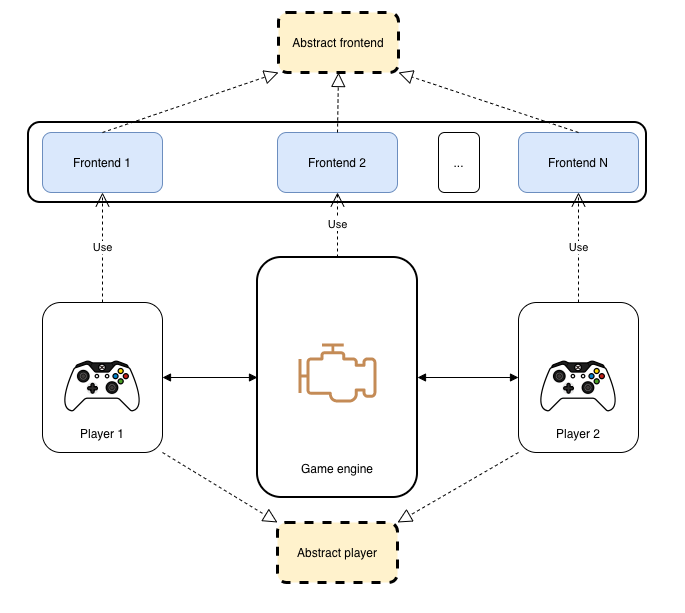
Take a look at the diagram below
In the center of it you can see a core of our game - this engine contains all the logic, process inputs and interactions with a user. On the both sides you can see a player that is bidirectionally connected to the game. On each turn player needs to receive an information about current game state and make a decision for the next action based on that. As you can see players derive from shared abstract class which means that you are able to create variety of custom players with different underlying logic as long as they conform to the interface. The same idea is behind abstract frontend: game and player are completely isolated from I/O details and you can plug any graphical user interface you want by writing an extra class for the new frontend.
NOTE: You might notice that this design generalizes really well, moreover this architecture can be applied to any turn-basedtwo players game.
With this flexible and easy to extend blueprint you can start developing a game using top-down approach. Simply saying you should have shallow overview for the future application and then you fill the gaps by writing a code from high level definitions to actual implementations.
Creating Python package for the Tic Tac Toe game
As mentioned before skeleton for the application should be your starting point. Create a directory named tictactoe and three Python modules called io.py, game.py, and player.py.
Each of those files correspond to the layers on the digram: io.py will provide an abstract class for the frontends and their implementations, game.py will contain all the logic for the game engine, and player.py keeps code related to interactions with a player, either with real human or the computer bot. There are also two special files with double underscores in their names. __init__.py tells Python that all the modules within this directory belongs to the same package. __main__.py gives directives of how to run this package, so you can think of it as of an entrypoint for the game. To learn more about packages refer to this tutorial.
Next step is to create virtual environment for the application. It’s a good practice to have separate isolated environment per each project you’re working on. Command below creates and makes active virtual environment using Python’s native venv module
You are finally ready to get your hands dirty and start writing the most interesting part of any game - it’s engine!
Implementing game logic
In object oriented world each entity should be defined as a class, so you do exactly the same and create Game class to represent our Tic Tac Toe Python game.
1 2 3 4 5 6 7 8 9 10 11 12 13 14 15 16 17 18
classGame(object): def__init__(self): pass
defmake_turn(self): pass
defprint_board(self): pass
defis_game_over(self): pass
defprint_winner(self): pass
defplay(self): pass
To start a game you need a board and two players, so let’s update __init__ method to include these fields. There is an extra is_x_turn boolean field keeping track of alternating turns between players.
It prints initial state of the board and enters the while loop which keeps running until a game is over. It also checks for the active player and obtains a turn either from x_player or from o_player based on is_x_turn flag. Then it executes a turn by placing a given piece within a chosen index provided by player. As a last step it prints the whole board to show you current game progress. Finally outside of the loop when the game is finished there is a greeting for the winner if any or draw announcement.
Checking for game over
One critical part of the game is to check game over condition. After each turn you need to know whether there is a row, a column, or a diagonal containing specifically one symbol. Python’s set guaruantees uniqueness of elements it contains, so if all the elements added to it are equal you’ll end up having an exactly one item within it. Don’t forget to also add a condition which checks that unique element you’ve found is not an empty cell as having all equal empty values in a row doesn’t mean the game is over.
1 2 3 4
# check rows for row in self.board: iflen(set(row)) == 1and row[0] != Cell.EMPTY: return row[0]
Next stop is a columns check and the logic is pretty much the same here. The only issue is that you cannot easily retrive all the columns for our board, so we need to apply tricky transformation using zip function
Look at the picture above to see how this transformation happens.
Inner lists are being extracted as individual variables corresponding to rows.
zip function takes corresponding elements of those lists and group them together.
Unpacking and list comprehension is used one more time to generate new outer list which now contains inner lists with columns data.
Technical detail: This operation is equivalent to matrix transposing and you can simpy use transpose method when working with NumPy library
The code for the columns check look almost the same but instead of the self.board there is a rotated version of it.
1 2 3 4
# check columns for column in [*zip(*self.board)]: iflen(set(column)) == 1 column[0] != Cell.EMPTY: return column[0]
In case you’re not familiar with this weird-looking asterisk operator check out this PEP.
When both or the checks above fail you need to take a look at the diagonals. As usually set is responsible to track tokens on the line examined
1 2 3 4 5 6 7
# check diagonals size = len(self.board) major_diagonal = set() minor_diagonal = set() for i inrange(size): major_diagonal.add(self.board[i][i]) minor_diagonal.add(self.board[i][size-i-1])
Last check for the size of sets and you can sign-off that the game should be still going if no criteria apply.
Code from the checks above will go into the _check_winner helper function, but you’ll need extra one called _check_draw to meet last request: if no winner is found the game should be terminated when no empty squares left.
1 2 3 4 5 6
def_check_draw(self) -> bool:# Python 3.5 for row in self.board: for cell in row: if cell == Cell.EMPTY: returnFalse returnTrue
Essentially that maps to code that goes over each cell row by row and inspects its value. If any cell is empty then at least one move is left, so a game can not be declared as completed.
Although you can simply compare cells elementwise but note how current code is easy to generalize: it will check rows, columns and diagonals for any table provided as long as rows count is equal to columns count.
Creating an interface for a player
You’ve already seen play method which tries to obtain a move from both players and that move should be a number pointing at specific cell. In order to do that you need to define an abstract class which basically means it’s a boilerplate for other classes. You cannot create an instance of this class and only when some subclass implements all the methods required it can be instantiated. To guarantee all these constraints Python provides special ABC class to inherit from and abstractmethod decorator to mark methods as required to be implemented in child classes.
1 2 3 4 5 6 7 8 9 10 11
# player.py from abc import ABC, abstractmethod
classPlayer(ABC): def__init__(self, name=None, frontend=None): self.name = name self.frontend = frontend
The only mandatory method is get_turn which will retrieve from players decisions made. Another property which seems like excessive here is a frontend. You’ll see why it’s needed later, so currently a default None value has been assigned to it. Now when it’s clear how you can retrieve a cell number from a player you can complete missing make_turn function.
Here modular arithmetic is used to calculate row and column index for the board where a piece should be placed. One nice advantage of this code is generalization for any board size. It will work for any NxN board without any modifications required. Then flag is switched to opposite state meaning the game will ask another player to move. That’s how alternating turns are performed.
Playing with a computer
The simplest way to implement first artificial opponent is to create dummy random player. It will randomly choose an empty cell without any other considerations. Update your code with a new class for a player called RandomPlayer and make sure it provides an implementation for the get_turn method.
1 2 3 4 5 6 7 8 9 10 11 12
# player.py import string import random
classRandomPlayer(Player): def__init__(self): random_name = "".join([random.choice(string.ascii_letters) for _ inrange(8)]) super().__init__(name=random_name)
defget_turn(self, board): pass
One peculiarity of this player is the ability to generate new names for each player instance. As with move choices it does that in a random manner by taking eight characters from an alphabet. Above you can see string concatenation of the chars from a list comprehension. Feel free to update the length for the name or select from a list of predefined authentic names.
Moving forward to the logic for the function. There is a loop over the board checking each cell and adding indexes for them into the list to select from. You should be already familiar with a formula to calculate index from row and column number, so here is just an inverted version of it.
1 2 3 4 5 6 7 8
defget_turn(self, board): available_cells = [] for i, row inenumerate(board): for j, column inenumerate(row): if board[i][j] == Cell.EMPTY: cell_index = i * len(board) + j available_cells.append(cell_index) return random.choice(available_cells)
Each empty cell index is added to the list and random module is used to select one of those.
Now you are going to create both players alongside a game instance and let them play with each other. For that you need to update an entrypoint __main__.py file with the following content
1 2 3 4 5 6 7 8 9 10 11 12
# __main__.py from tictactoe.game import Game from tictactoe.player import RandomPlayer
To launch the game for the first time you need to invoke tictatoe module with Python interpreter using -m flag. Note that command below should be executed from parent directory which contains tictactoe folder.
1
$ python -m tictactoe
Seems like game exited successfully but you can’t see what actually happened. You obviously need some way of drawing a board state after each turn to track game’s progress.
Implementing GUI frontend
Now it’s time to open the curtain in front of our code and visualize underlying game mechanics. To keep things simple you will be using regular systems console and print everything into the shell. Graphics will be character-based and Unicode symbols will be used to create a bit prettier look. As usually let’s think about a big picture first before diving into implementation details.
Defining abstract frontend
Requirements for the input-output interface are pretty straightforward:
It should be able to display a board provided.
It should print a message when the game ends.
It should retrieve an information about move decision from a user.
For each of the items in the list you have a corresponding abstract method declared. Frontend is completely separate entity which does not rely on any game internals. As long as you invoke its method with proper arguments it will handle interactions with a user for any game written. On the other hand it follows single responsibility principle which makes it independent from the rest of the application, so you can easily plug new one without affecting any other components of the program.
Drawing
Having an interface in place you can create a very first implementation of it. Begin by defining a class which inherits from IOFrontend and overrides all the methods required.
defget_input(self): returninput("Enter a number of the cell: ")
placeholder property will be used to display hints on an empty cells, so you will know on which exact cell to place your mark. To query an actual choice input built-in function is used which simply reads everything typed on the keyboard. print_winner method when given a name declares it as a winner, otherwise a draw announcement is made.
1 2 3 4
if name isNone: print("🌼 It is a draw! 🌼") else: print(f"🎉 Player {name} wins! 🎉") # Python 3.6+
To print the board itself you need to iterate over the board and print each row line by line. You check each cell and display a corresponding mark if occupied and for empty cell you show a placeholder for a vacant place. To calculate a number for a cell modular arithmetics is used once again. It’s a simple formula i * len(row) + j which takes current row and current column and gives an equivalent correspondence represented as a single number.
1 2 3 4 5 6 7 8 9 10
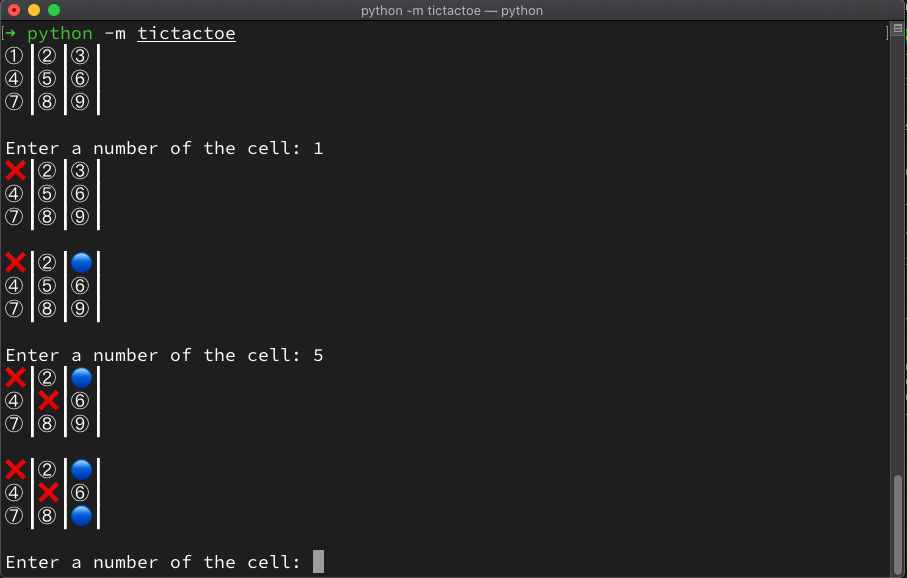
for i, row inenumerate(board): for j, column inenumerate(row): if (cell := board[i][j]) == Cell.X: # Python 3.8+ print("❌", end="┃") elif cell == Cell.O: print("🔵", end="┃") else: print(self.placeholders[i * len(row) + j], end=" ┃") print() print()
Above you can see complete implementation of print_board method. Extra calls to print function without agruments are used to output new lines for cleaner look. Having that in place you can finally delegate drawing responsibilities to the frontend.
At this point all of the stub methods are implemented and you have finished writing Game engine. You are excited to see where all of this going, aren’t you? Just invoke the module one more time with
1
$ python -m tictactoe
and watch two random computer players trying to defeat each other. Final step is to replace our random players and to allow you for the first time to actually play the game. In order to do that you will need another implementation of the player which interacts with real user.
For simplicitly any kind of validation is omitted here, but ideally you should check whether an input is a number, whether given number within a range, and whether a cell on the board is indeed empty. That’s another reason why board parameter is present within function definition. Plug ConsolePlayer into the game by one small modification
1 2 3 4 5 6
# __main__.py defmain(): console_frontend = ConsoleFrontend() player = ConsolePlayer("Doge") # enter desired name here game = Game(x_player=player, frontend=console_frontend) game.play()
You can also replace x_player parameter with o_player if you want to play for the Os team and even create a two-humans game. Start by creating another instance for a new player and pass both of them to the game constructor.
Try it with your friend, play for both sides, or just oversee random battles.
You should be able to see how easy is to modify game’s behaviour due to proper structure of the application and how little changes it requires. To prove this statement one more time you are going to implement another frontend and redraw a look for the game.
Alternative frontend
You’ve made a good job putting everything together, so . There are two extra libraries which can help you adjusting overall appearance, namely click and terminal tables. First one provides an ability to play around with colors and clearing the screen between moves, so only the current state of the board is visible at any given moment. Second library draws simple tables in a console and handles evrything related to alignment and borders. Install them within virtual environment using pip executable.
1 2
$ pip install click $ pip install terminaltables
You are ready to import these libraries and sketch a class for the new frontend. Logic for printing winner and handling input is exactly the same, the only thing you add here is colorization for the background when printing a text.
1 2 3 4 5 6 7 8 9 10 11 12 13 14 15 16
# io.py import click from terminaltables import SingleTable
defprint_winner(self, name=None): if name isnotNone: click.secho(f"{name} is a winner!", fg="black", bg="green") # Python 3.6+ else: click.secho(f"A draw on the board!", fg="black", bg="cyan") # Python 3.6+
defget_input(self): returninput("Enter a number of the cell: ")
The same applies to the print_board method - no major differences besides clearing the screen before drawing the board and making sure all the data is printed within a nice grid.
# io.py defprint_board(self, board): table_data = [] click.clear() for i, row inenumerate(board): table_row = [] for j, column inenumerate(row): if (cell := board[i][j]) == Cell.X: # Python 3.8+ text = click.style(cell.value, fg="red", bold=True) elif cell == Cell.O: text = click.style(cell.value, fg="blue", bold=True) else: text = str(i * len(row) + j + 1) table_row.append(text) table_data.append(table_row) table = SingleTable(table_data=table_data) table.outer_border = False table.inner_row_border = True print(table.table) print()
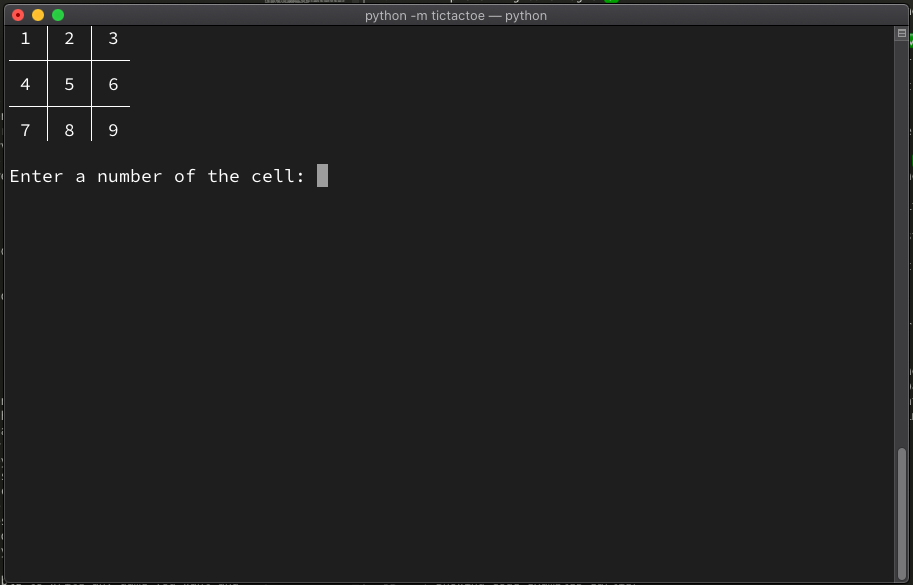
In order to print game board as a table you need to prepare the data for it first. There is an extra list called table_data which contains the text for each cell groupped by rows. Then you create an instance for the SingleTable and remove outer borders while preserving lines inside. That makes an exact look for the Tic Tac Toe board as you used to see on a paper. Just two lines to hook up table-based frontend to our code and you are ready to play again.
1 2 3
# __main__.py table_frontend = TableConsoleFrontend() # this is our new frontend game = Game(x_player=player, frontend=table_frontend)
If everything is done properly you should be able to see this wonderful small board on your screen the same way as below
Conclusion
Every journey comes to an end, but that doesn’t mean you have to stop here. There are a lot of possible improvements you might bring into the game. In case you are interested in developing nice user interface you can check PyGame framework or become familiar with PyQt. If you want to extend a game with some new feature you can begin with storing a statistics for the game, for example number of wins, loses, and total games played. You can either store everything in a file on the disk or connect your application to the real database. As the last suggestion I’d like to point you to the minimax algorithm with the help of which you can create a perfect computer player for the game impossible to beat.
With a knowledge gained in this article you’ll be able to write any game you want and continue this exciting adventure of game development. Just keep in mind one thing: patterns in programming are always the same, learning them once well will pay off handsomely on the hundreds of applications. Take care!
]]><h3 id="Intro"><a href="#Intro" class="headerlink" title="Intro"></a>Intro</h3><p>Computer games are a lot of fun! They are even better whenRedis scriptinghttps://bmwant.link/redis-scripting/2021-10-01T13:39:25.000Z2024-05-08T13:39:43.823ZRedis has built in Lua interpreter allowing to evaluate scripts in the context of Redis server. I want to show you a couple of examples where this scripting feature might be helpful. So imagine the following scenario (use case #1):
you have decided to introduce TTL to you records for optimization reasons. There is no default TTL in Redis, so keys are set to live forever. This might clog your memory resulting in frequent evictions affecting the performance. Therefore it’s much more preferable to expire your items earlier and keep overall memory usage about 70-80% level.
you cannot delete all the data at once as your application relies on that. Needless to say you have already created same keys with ttl attribute set on them. The only issue you have right now is to delete old records without expiration date.
Normally you would go over all keys within database, check their ttl value and remove keys without expiration one by one.
for k in$KEYS; do TTL=$(redis-cli -h "$REDIS_ENDPOINT" ttl "$k") if [[ $TTL -ne -1 ]]; then echo"." redis-cli -h "$REDIS_ENDPOINT" del "$k" fi done
Make sure you have redis-cli executable installed before running the script
1 2
$ apt update && apt install -y redis-tools $ ./delete_without_expiration.sh # save the content above into the file
This shell script would do the jobs, but it has some major drawbacks:
keys operation is blocking and is not recommended to be used on production environments
It may ruin performance when it is executed against large databases
for each key it requires at least one extra connection to be made (for the ttl check) and then one more in case deletion is required;
this script is not atomic: it might need to be relaunched in case some network flakiness occurs;
this is horribly slow: it will not perform well on any database with more than 1 million keys (which is not even a big number for any application heavily relying on the cache).
Let’s rewrite these steps to the native Lua script
1 2 3 4 5 6 7
local pattern = '*' for _, k inipairs(redis.call('keys', pattern)) do local ttl = redis.call('ttl', k) if (ttl == -1) then redis.call('del', k) end end
Although the algorithm is identical it will not suffer from extra network delays as it is ran directly by the engine itself. To be fair the latter solution is bettern in case you are running hosted Redis solution such as AWS Elasticache otherwise network delays will not be noticable as you can run the script on the same machine where the Redis resides.
Moving forward to the next example (use case #2) consider the following scenario:
you need to downscale instance size in order to save costs (obviously you have collected all the metrics needed, monitored the usage over certain period of time and concluded it would not impact performance or any other critical APM metric);
you cannot remove all the records at once, scale back down and then re-populate the cache with new items as it would disrupt application running causing possible downtime.
Normally you would do
1 2 3
$ export REDIS_ENDPOINT="redis-cache.abcde1.ng.0001.use1.cache.amazonaws.com" $ redis-cli -h "$REDIS_ENDPOINT" flushall $ redis-cli -h "$REDIS_ENDPOINT" flushall async # to run in non-blocking manner
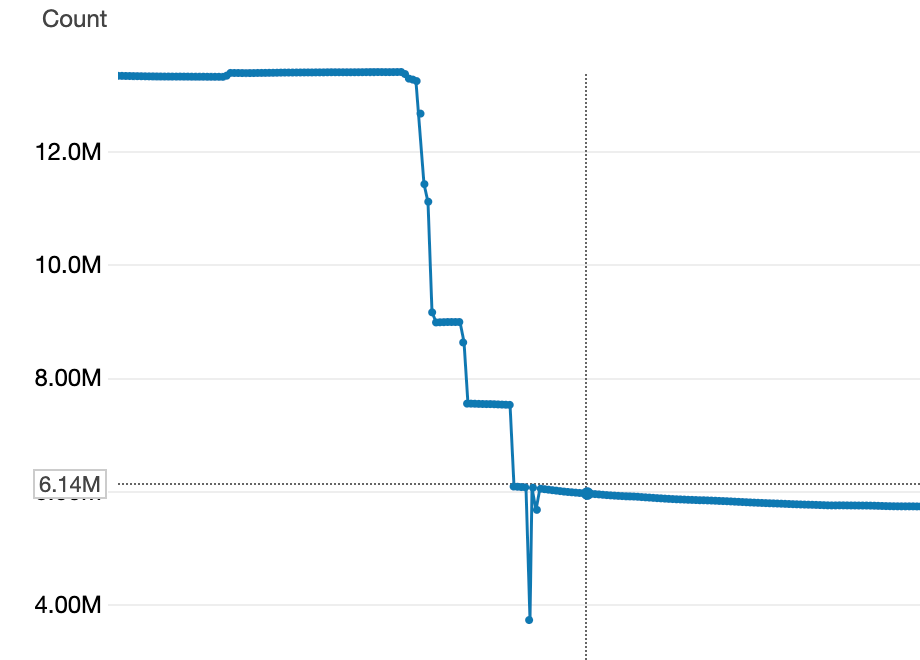
With our custom script we will be able to delete only subset of keys. Moreover we are going to introduce two new features: to be able to provide keys pattern as a command line argument and to return total number of deleted items.
1 2 3 4 5 6 7
local counter = 0 local pattern = ARGV[1] for c, k inipairs(redis.call('keys', pattern)) do redis.call('del', k) counter = c end return counter
This is really useful when you know exactly the underlying naming for the most of your keys, meaning you can safely drop them provinding the known prefix/pattern. As a result total number of affected records will be printed back to the console.
NOTE: make sure to insert comma in the command above as it serves as a delimiter between KEYS and ARGV and we are using only the latter within our script
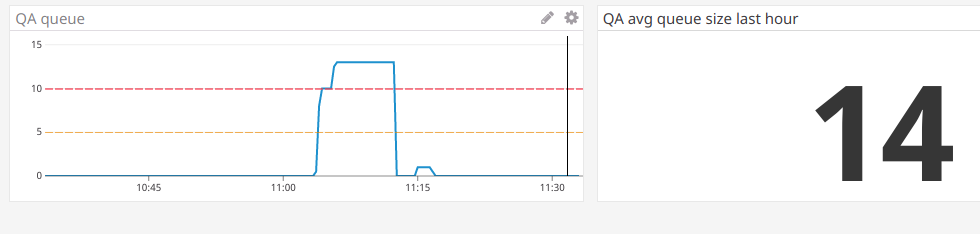
Below you can see a chart of four subsequent invocations using different patterns that we’ve applied to the our database before downscaling procedure.
This script helped us to drop half of the items in cache allowing to migrate to the twice as small instance size as the original one.
]]><p>Redis has built in Lua interpreter allowing to evaluate scripts in the context of Redis server. I want to show you a couple of examples wRecursion in Pythonhttps://bmwant.link/recursion-in-python/2021-09-07T21:00:24.000Z2024-05-08T13:39:43.823Z
NOTE: All the code below has been tested using Python 3.8.12 and some of the syntax might not be compatible with older versions.
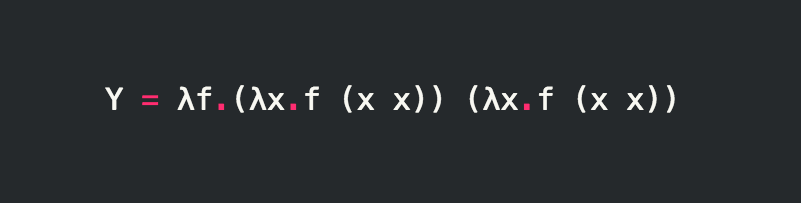
One of the main selling points of any functional programming language is recursion or rather an elegant way you can implement recursive function using one’s syntax. In this article I want to show that Python can be easily adapted to be written in a functional way proving it’s a trully multi-paradigm language. Everyone knows classical example of recursion using Fibonacci sequence, so let’s take a look at the corresponding Python code for it.
1 2 3 4 5
deffib(n: int) -> int: if n == 0or n == 1: # base case return n
return fib(n-2) + fib(n-1)
We have a function accepting a number and returning an element of the Fibonacci sequence corresponding to that number. Each recursive function should have a base case (also known as edge case) and essentially it’s a branch of code which halts or returns something immediatelly without making any subsequent recursive calls. Then we have two recursive function calls calculating two previous numbers of the sequence and basically that corresponds to the definition where each number is just a sum of two prior ones in a sequence. Most of the functional languages are also known to be statically typed, so we are also using type annotations within our code examples to make them look more functional-ish.
Minimum efforts
Now let’s implement a couple of frequently used common functions to illustrate such things can be implemented concisely in a recursive fashion.
Our first subject is maximum / minimum function returning target element from the list.
1 2 3 4 5 6 7 8 9 10
defmaximum(arr): ifnot arr: raise ValueError('Cannot find maximum in an empty list')
iflen(arr) == 1: return arr[0]
x, *tail = arr max_tail = maximum(tail) return x if x > max_tail else max_tail
As usually we start from a base case knowing that maximum element of the list containing only one element is the element itself. The biggest element of the whole list is either current one or the biggest element from the rest of the sequence. Here we use list destructuring to seamlessly extract first element from the list as well as its tail into two different variables. Same result can be accomplished using approach below (in case you are not comfortable with such a syntax):
Same logic applies to the minimum function, but here instead of comparison we invoke min built-in function.
1 2 3 4 5 6 7 8
from typing importList
defminimum(arr: List[int]) -> int:# type annotations for clarity x, *tail = arr # list unpacking ifnot tail: # base case return x
returnmin(x, minimum(tail)) # recursive call
Rewrite everything with recursion
Below you can find couple of extra functions just to demonstrate how similar their structure is and how fluently any structure can be translated into recursive calls.
replicate takes a number n and a value val and returns a list containing n copies of the same val value
1 2 3 4 5
defreplicate(n, val): if n <= 0: return []
return [val, *replicate(n-1, val)]
Example invocation:
1 2
>>> replicate(3, 42) [42, 42, 42]
take - given a number n and a list arr it returns first n elements from that list
zip takes two lists and zips them together. It returns one list each element being a pair of matching elements from input lists. In case one list is shorter the resulting list would not contain items from the longer list that do not match with anything in the end.
As an extra exercise you can start by taking any function from itertools module and trying to come up with equivalent recursive code. Most of the functions there have rough code implementation provided within the documentation page above, so it would be much easier to understand what kind of logic you are trying to achieve.
Quick, sort!
There are a lot of graph traversal algorithms which are easier to implement using recursive functions as well as this example of quicksort algorithm because their own definitions are declared in recursive terms. To accomplish sorting we start with pivot element which in the simplest case is just a first element of our list and place it between two partitions: first one is an array of sorted elements which are less or equal to our pivot and the second one is an array of sorted elements greater than that.
1 2 3 4 5 6 7
defquicksort(arr): ifnot arr: return [] x, *tail = arr smaller_sorted = quicksort([t for t in tail if t <= x]) bigger_sorted = quicksort([t for t in tail if t > x]) return [*smaller_sorted, x, *bigger_sorted]
As you can see there is nothing complex about recursion and some implementations can be even simpler then their iterative counterparts. Sometimes recursive code might be a bit harder to debug, so when in doubt always stick with the solution that is easier for you to understand and maintain. Otherwise go ahead and implement your new feature using recursive functions. Happy coding!
]]><p><img src="/images/y_combinator.png" alt="y-combinator"></p>
<blockquote>
<p><strong>NOTE</strong>: All the code below has been tested usiUse NFS for docker volumes on Machttps://bmwant.link/use-nfs-for-docker-volumes-on-mac/2021-06-09T12:10:38.000Z2024-05-08T13:39:43.827ZWe are using docker/docker-compose as a development environment for our project and to sync the code between container and IDE INVALID POST SLUG PROVIDED is used. Unfortunately, performance for the file-related operations on MacOS is really horrible and it’s kinda a well-known issue.
Common solution usually is to set cached option on a volume like this (. is a current working directory for the project)
where /Users/username/workspace is a path to the directory where all of your projects reside. It allows sharing any directory within folder specified (so you might specify just a single project’s dir here).
Next edit this file sudo vim /etc/nfs.conf to allow Docker’s NFS connections by the daemon
1
nfs.server.mount.require_resv_port = 0
Now restart the daemon to pick up added changes
1 2
$ sudo nfsd restart $ sudo nfsd status
We are ready to adjust docker-compose.yml file and mount volume the new way
1
$ cp docker-compose.yml docker-compose-nfs.yml
A copy of configuration is created not to conflict with your teammates who have different operating systems and this configration will be invalid for them. If you are doing this just for yourself it’s probably a good idea to even add this file to .gitignore.
And start your project as usually explicitly providing compose configuration via -f flag
1
$ docker-compose -f docker-compose-nfs.yml up -d
That’s it, let’s check what has been changed about performance.
Comparison
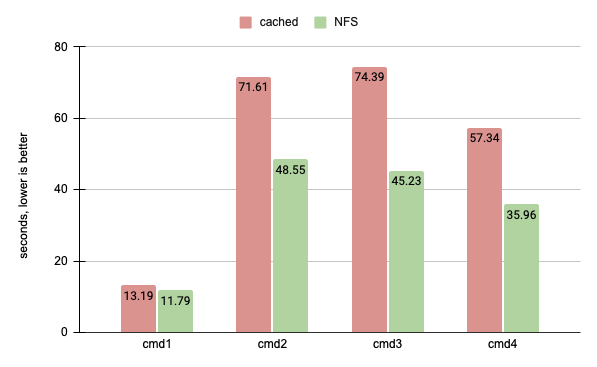
I have selected couple of popular commands used when developing simple Django/React based web application. Those do a lot of file-related operations, so will be indicative for our tests.
cmd1: poetry run python manage.py collectstatic
cmd2: rm -rf `find . -name __pycache__`
cmd3: npm run build
cmd4: NODE_ENV=production npm run build
As you can see on a chart below NFS configuration clearly wins (not significantly, but noticable when frequently execute them during the day)
So as a conclusion it’s worth trying to set up NFS volume for your local dev env. You can also take a look at docker-sync and docker-bg-sync projects to try different approaches and see what works better for you.
]]><p>We are using docker/<a href="https://docs.docker.com/compose/">docker-compose</a> as a development environment for our project and to synSetup Dogecoin network node on Ubuntuhttps://bmwant.link/setup-dogecoin-network-node-on-ubuntu/2021-05-15T15:45:12.000Z2024-05-08T13:39:43.827Z
Intro
In this article I’ll be showing how to setup a full Dogecoin network node on Ubuntu 20.04. This might be useful if you want to interact directly with blockhain (e.g. create transaction, send/receive coins, validate network addresses) or just help community providing your server to make network stable and operable. Your instance should have at least 2Gb of memory and 80-100Gb of free disk space (current blockchain size is about 50Gb). Setup should also apply for previous versions of Ubuntu but I have verified it only for Focal Fossa, so there is no guarantees for these exact commands to work. Reach to the official build notes to adjust commands if needed.
Prerequisites
It’s always a good idea due to security reasons to create separate user that will be running the daemon process and will be isolated from the rest of the system.
1 2
$ sudo adduser doge $ sudo usermod -aG sudo doge
The rest of the article assumes that we are working as a doge user. To switch user (e.g. if you are root currently) type this command
1
$ sudo su - doge
Now we are ready to proceed with installation. First of all we need to ensure all the dependencies required are in place
We’ll be working from home directory /home/doge, so make sure you have navigated to your target dir if you plan to install everything elsewhere. Clone source code and define a shell variable to be used within build process
Another dependency is Berkeley DB which is used to store wallet data. Although you can install different version of it 5.1 is recommended in order to maintain portability of the wallet between the standard Dogecoin Core distributions. The easiest way to install it is by using this automation script
Note: We are not installing graphical user interface here which requires Qt and other dependencies to be installed. In case you want to have UI to interact with your wallet you have to include these steps and remove --without-gui flag from instructions above.
Installation is finished, so run this command to install executables and make them available within PATH
1
$ sudo make install
Optionally you can run tests to confirm that everything works properly for the codebase downloaded
1
$ make check
Launch
Daemon will start downloading full blockchain, so confirm that you have enough space on your disk by running df -h. Additionally you might want to store the data on a separate volume to isolate from the rest of the system and that’s exactly what I’ll be doing here. In order to accomplish this we need to pass extra flags prior to launch
1 2 3
$ which dogecoind # make sure executable is reachable # /usr/local/bin/dogecoind $ dogecoind -printtoconsole -conf="/home/doge/.dogecoin/dogecoin.conf" -datadir="/mnt/data/dogecoindata"
If you are ok to store everything within home directory you can omit both -conf and -datadir options. -datadir is a path to a directory (possibly on a separate volume) where all the blockchain data will be stored. -conf parameter needed to specify configuration file which will be created within the abovementioned data directory, so we override that back to default location. -printtoconsole allows for the output to be displayed right back to console instead of being written to the file. If you skip that you can still get logs later with tail -f /mnt/data/dogecoindata/debug.log (or /home/doge/.dogecoin/debug.log for default location).
The process on blockchain synchronization might take a while, so if you are using remote instance it’s better to run everything using screen utility. It will keep your shell alive as well as the processes spawned within it in case of connection loss or other issues with ssh.
1
$ screen -S doge
will create a named doge session and Ctrl+A, D sequence will deattach from it keeping everything in the background.
1 2
$ screen -ls # list all active sessions $ screen -r doge # connect back to our shell
Here -ls option lists all active session and -r flag restores a session specified by it’s name.
Creating a service
Launching process manually and maintaining screen sessions might be a bit unconvenient, so we want a deamon to start on system startup and to be restarted in case of any issues. For that create a systemd configuration file
Two most important things here are command that launches a daemon (slightly modified version of what you’ve already seen) and definition of user/group pair owning the process. Now we need to launch it and enable service on startup.
Last statement checks status of the process and you are looking for active (running) state in the output. Again, to check logs we need to look at debug.log file
1 2 3
$ tail -f /mnt/data/dogecoindata/debug.log # or for default location $ tail -f /home/doge/.dogecoin/debug.log
Go for a long coffee-break as downloading of all the blocks might take from couple of hours up to a full day.
Configuration file
Create configuration file for your daemon if hadn’t have yet vim /home/doge/.dogecoin/dogecoin.conf and put these content into it
Do not reuse password provided as an example here and generate something from your random string with
1 2
$ echo"my random string" | md5sum # c09417d8d454dff21664a30f1e734149
Current config file will be mostly used by RPC clients like native dogecoin-cli or python-dogecoin. For other parameters see complete list of available options.
You might need to restart your current dogecoind service in case you have modified any of the settings within configuration file
1
$ sudo systemctl restart dogecoind
Validation
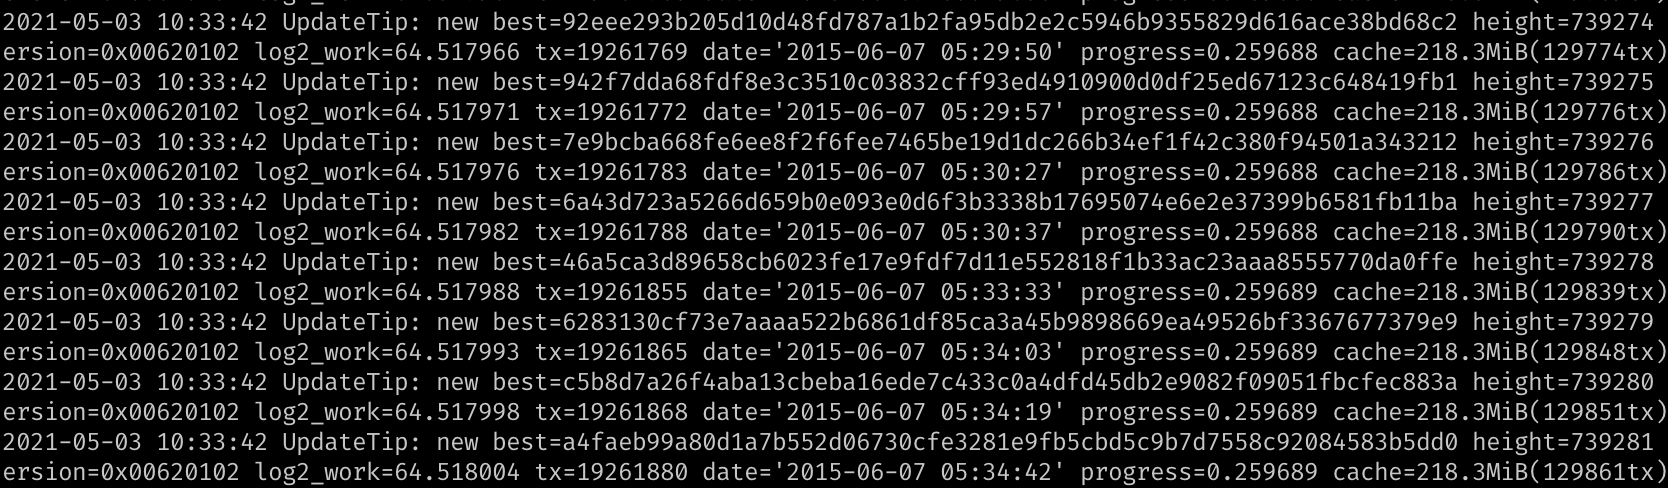
Once you see progress=1.000000 in the logfile it means that the full blockchain has been downloaded and you are ready to interact with it.
Here’s couple of commands you can use to test your installation
validate Dogecoin address
1 2 3
$ which dogecoin-cli # /usr/local/bin/dogecoin-cli $ dogecoin-cli validateaddress "D7DA74qzZUyh9cctCxWovPTEovUSjGzL2S"
get wallet address for the account (creates new acc if doen’t exist)
1
$ dogecoin-cli getaccountaddress "myaccount"
check balance for the account
1
$ dogecoin-cli getbalance "myaccount"
Conclusion
I hope this tutorial was detailed enough to give all information needed to create fully working Dogecoin network node from bare Ubuntu instance. Now you can start building applications to interact with blockchain or just participate in supporting the network. If you still have questions you can post in this amazing Reddit community or create new issue on Github.
Note: running a network node is not equal to mining Dogecoins, so you will not receive anything like transaction fee or block reward for doing this. Personally, I’m not encouraging mining at all (see my position on that in INVALID POST SLUG PROVIDED /crypto-is-the-future-afc2e832bb5b/), so if you are looking to do that it’s better to check services like unMineable.
See you later and remember
Do Only Good Everyday!
]]><p><img src="/images/dh7sjwznlgx61.jpg" alt="doge pic"></p>
<h3 id="Intro"><a href="#Intro" class="headerlink" title="Intro"></a>Intro</h3><Blog migrationhttps://bmwant.link/blog-migration/2021-04-27T15:15:10.000Z2024-05-08T13:39:43.823ZRecently I’ve decided to migrate my blog written with Flask/Python 3 to be a SPA using Vue.js. Due to a lack of free time I don’t see this migration to be finished in the nearest future.
To continue publishing some notes online I went for Hexo static site generator which allows quickly create new posts using simple Markdown syntax and deploy them either to Github Pages or to Firebase Hosting (the latter one was chosen).
Below you can find a couple of screenshots for the previous version of the blog to have a taste of how it was looking back the good old days.
Index/posts page
Instagram zone page
About page
]]><p>Recently I’ve decided to migrate my blog written with <a href="https://flask.palletsprojects.com/en/latest/">Flask</a>/Python 3 to be a SYou know what I meme part 1https://bmwant.link/you-know-what-i-meme-1/2020-04-04T13:05:10.000Z2024-05-08T13:39:43.827ZSomething very important that I have to store somewhere, so here we go
Some of them are in Russian but nevertheless
Have fun, see you!
]]><p>Something <em>very</em> important that I have to store somewhere, so here we go</p>
<p><img src="/old/memes/b827c6736eb63f5582eca87699208Simple FFI in Idrishttps://bmwant.link/simple-ffi-in-idris/2020-03-26T18:41:40.000Z2024-05-08T13:39:43.827ZFFIForeign Functions Inerface allows you to call a code written in one language from a code written in another language. In this post I will show you how to do that in dependently typed programming language called Idris. We will be able to call C code from Idris and vice versa.
Invoking C code from Idris
First let’s create simple program in C which will allow us to calculate factorial (file factorial.c)
$ idris ffi.idr *ffi> :exec main factorial 9 = 362880
Calling bulletproof Idris code from C
For this example we are going to create Idris data type which is equivalent to the list of integers (file list.idr)
1 2 3 4 5 6 7 8 9 10 11 12 13 14 15 16
nil : List Int nil = []
cons : Int -> List Int -> List Int cons x xs = x :: xs
showList : List Int -> IO String showList xs = do putStrLn "Our list is: " pure $ show xs
exportList : FFI_Export FFI_C "list.h" [] exportList = Data (List Int) "ListInt" $ Fun nil "nil" $ Fun cons "cons" $ Fun showList "showList" $ End
We provide nil and cons functions allowing to construct a list and helper showList function which displays our list on a screen. As opposed to C header file which declares functions we need to have special export functions (exportList from the above) which defines functions and types alongside their aliases as a return value. To proceed type idris list.idr --interface -o list.o into a shell. This code will generate object file and a header which we are going to include into our C source code
C part is a bit trickier as we need to create an Idris virtual machine which will be running our functions and every function call also expects vm as a first parameter. At the end we need to free resources, so there is a close_vm call as well.
Finally back to our compilation command which is a bit complex this time
and if nothing goes wrong you should be able to run list executable
1 2 3
$ ./list Our list is: [10, 20]
Ok, at this point you should have an overall idea of how to do inter-language calls. This might be useful for creating language bindings for popular libraries in Idris (like this Qt binding for Haskell for example). So if you are interested in developing ecosystem for this amazing language here’s your next adventure. Happy coding!
]]><p><a href="https://en.wikipedia.org/wiki/Foreign_function_interface">FFI</a> <em>Foreign Functions Inerface</em> allows you to call a code Connect to your RDS instance from another VPChttps://bmwant.link/connect-to-your-rds-instance-from-another-vpc/2020-03-05T14:49:05.000Z2024-05-08T13:39:43.823ZSuppose you have created a PostgreSQL database without public accessibility (we are talking about AWS RDS right now) within some VPC (e.g. VPC B) and you have a regular EC2 instance in another VPC (e.g. VPC A). Now you want to connect a client (e.g. psql) from an instance to database. VPC peering is a tool that you need to use in such a case
Check different scenarios here if you want to connect from different VPC or without it altogether.
First of all you need to have a peering connection in place. Go to Services -> VPC -> Peering Connections and create new connection. Select requester (VPC B) and accepter (VPC B) and click Create. Then choose Actions -> Accept Request to activate created connection.
Update route tables
Go to Subnets and check the subnet where you EC2 instance is launched. It should have route table associated with it.
Click on the target route table and choose Actions -> Edit routes.
For the first VPC enter CIDR block of second VPC as a Destination and our Target is the peered connection we have already created. Do the same for the route tables of the second VPC. Now you have established routes between both of your VPCs.
You might have multiple subnets within the same VPC, so make sure to update all of them. Keep in mind that we are allowing resources to be accessed for the entire CIDR block because it’s just a bit easier to setup but you can limit that to particular subnet/resources (check links in resources below) if you need to.
Update security groups
Last thing is to actually allow incoming connections from your instance to a port database is listening on (in our case it’s 5432). Go to RDS -> Databases and click on your target database
Then select security group used and add a private IP address of your instance to the inbound rules like this
Final steps
Now you should be able to test connectivity to your database from an instance. Connect to it first
]]><p>Suppose you have created a PostgreSQL database without public accessibility (we are talking about <a href="https://aws.amazon.com/rds/">ACreating desktop screenshots with Pythonhttps://bmwant.link/creating-desktop-screenshots-with-python/2020-03-05T11:29:52.000Z2024-05-08T13:39:43.823ZIn this article I’m going to show how to accomplish a simple task of creating a screenshot using various Python tools. Alongside we’ll see other useful methods of working with pictures. Let’s start with the simplest way possible.
We’ll be using pyscreenshot package pip install pyscreenshot
1 2 3 4 5 6 7 8 9
import pyscreenshot
im = pyscreenshot.grab()
# save image file im.save('screenshot1.png')
# show image in a window im.show()
Three lines of code (importing/instantiating/saving). Is there anything easier than that? Actually, pyscreenshot is a wrapper around various backends, so to make it work you have to have at least one of it installed. pip install Pillow will work for this example by using popular Python fork for PIL called Pillow.
PyAutoGui
PyAutoGUI is really powerful module for automation. It’s capable of moving your mouse, control keyboard and handle user inputs. It also has a handy way of creating a screenshot but basically it’s again a wrapper around Pillow. So go with pip install pyautogui and add another three simple lines of code
1 2 3 4
import pyautogui
im = pyautogui.screenshot() im.save('screenshot2.png')
PyQt
PyQt is even more powerful toolkit allowing you to create complex GUI applications. It’s a set of binding for Qt framework which Python users can utilize. The program will be a little longer because you need to instantiate your application object but really you might want to use this snippet only if you already have some code written PyQt or plan to develop graphical application. As usually we start by installing package with pip install pyqt5. There is an older version PyQt4, so make sure you didn’t accidentally install that because they are not totally compatible and you should be using newer release.
1
2
3
4
5
6
7
8
9
10
import sys from PyQt5.QtWidgets import QApplication from PyQt5.QtGui import QScreen
app = QApplication(sys.argv) im = QScreen.grabWindow( app.primaryScreen(), QApplication.desktop().winId() ) im.save('screenshot3.png')
wxPython?
If for some reason you happen to use wxPython there is a recipe for you as well.
# Create a memory DC that will be used for actually taking the screenshot memDC = wx.MemoryDC() # Tell the memory DC to use our Bitmap # all drawing action on the memory DC will go to the Bitmap now memDC.SelectObject(bmp) # Blit (in this case copy) the actual screen on the memory DC memDC.Blit( 0, 0, width, height, screen, 0, 0 ) # Select the Bitmap out of the memory DC by selecting a new bitmap memDC.SelectObject(wx.NullBitmap) im = bmp.ConvertToImage() im.SaveFile('screenshot4.png', wx.BITMAP_TYPE_PNG)
The only important note is that you should install/build your Python distribution with framework support enabled. With pyenv it’s simple as the following
Otherwise you might get annoying error which prevents you from running the code, error message example from my laptop below
1 2 3
This program needs access to the screen. Please run with a Framework build of python, and only when you are logged in on the main display of your Mac.
Cropping a screenshot
Usually you are interested in some specific region of the image (called ROI/box) not the fullscreen. Here’s couple of method how that can be done. First one does the job with OpenCV pip install opencv-contrib-python
1 2 3 4 5 6 7 8 9 10 11
import cv2
im = cv2.imread('screenshot.png') # initial point x = 0 y = 0 # size of the resulting image height = 200 width = 400 cropped = im[y:y + height, x:x + width] cv2.imwrite('cropped.png', cropped)
Note that x and y indexing within im is swapped here, so double-check your code.
]]><p>In this article I’m going to show how to accomplish a simple task of creating a screenshot using various Python tools. Alongside we’ll seQuick introduction to DataDog agenthttps://bmwant.link/quick-introduction-to-datadog-agent/2019-12-23T17:22:34.000Z2024-05-08T13:39:43.823ZDataDog is a very powerful monitoring platform. In this article I’m going to show couple of the most frequently used commands for a new developer who has a little experience working with it previously. So let’s go over main things and create a simple configuration for monitoring disk space. Imagine that we have an Ubuntu instance up and running an agent. Visit installation page if don’t have it already or provision your instance with Ansible using Galaxy playbook.
Check the agent is up and running
First we want to make sure that the corresponding service is up and running
1
$ sudo service datadog-agent status
In case something went wrong check out system logs as well
1
$ sudo journalctl -u datadog-agent.service
Remember, that main configuration file is stored here /etc/datadog-agent/datadog.yaml (default location), so double check it and update settings according to error messages if any.
Now when the service is running we want to check its self-reporting status with
1
$ sudo datadog-agent status
Implementing a check
DataDog can monitor dozens of instances at the same time, so the first thing you might want to get is the unique identifier of your current instance. You can do that with a simple command
1
$ sudo datadog-agent hostname
Now we know which hostname to use when looking up an instance in your dashboard.
By default agent collects metrics from all the devices available (output from df -h)
So information from your dashboard might be misleading and you would have false alerts even when the disk is not full. To monitor only the device that mounted to the root / we want to replace a default configuration with the following
1 2 3 4 5 6 7 8 9
init_config:
instances: ## Instruct the check to collect using mount points instead of volumes. -use_mount:true
## Collect data from root mountpoint (regex) mount_point_whitelist: -^/$
Save the content to the file /etc/datadog-agent/conf.d/disk.d/conf.yaml. Remember that all the configuration is stored within the subfolders of conf.d directory, so it’s the place where you want to edit existing or to put newly created checks. Do not worry about conf.yaml.default file, it’s not taken into account once file without .default extension is placed within the same directory.
Ok, now we are going to launch our disk check to make sure everything works properly
1
$ sudo -u dd-agent -- datadog-agent check disk
You will receive series information and a short summary, so it’s time to visit a web page for the host’s dashboard
You can see that the value is exactly the same as in Use% column, so now host reports correct metric with proper information. Just make sure that you have monitors for all the critical metrics for your infrastructure and you will be alerted if something goes wrong.
Further debugging
If you still have some issues and need another extra bit of information commands below might help
1 2 3
$ sudo datadog-agent version $ sudo datadog-agent health $ sudo datadog-agent configcheck
Those will show you current version/commit of the agent running, its health and the validation for the whole configuration is made. If nothing helps at this point as a last resort you might want to send the complete dump of debugging information straight to the DataDog support with
1
$ sudo datadog-agent flare
This will create new support case and send all the troubleshooting information needed.
]]><p><a href="https://www.datadoghq.com/">DataDog</a> is a very powerful monitoring platform. In this article I’m going to show couple of the Monitoring Celery queue with Datadoghttps://bmwant.link/monitoring-celery-queue-with-datadog/2019-12-23T17:02:50.000Z2024-05-08T13:39:43.823Z
Sometimes your Celery workers are having hard time processing all the tasks from a queue. It might be due to your tasks being long running or due to a high load on workers themselves. Obviously you need to consider autoscaling in order to handle this issue but in a first place you need to know is something going wrong. For this purpose we will setup monitoring with Datadog platform. The easiest way to know when your queue is getting bigger is by restricting your workers of fetching more than one task at once (set prefetch limit to 1: pass --prefetch-multiplier=1 when launching your worker). This way tasks would be hanging in a queue if no worker is able to process it and therefore it will be easy to monitor queue size.
I’m assuming that you have already installed datadog agent and you are using Redis as a broker. Celery will create a list for your queue with a key named after your queue name (default one is celery in case you do not have an extra routing). The only thing you need to do is to create a file with content
and place it at the /etc/datadog-agent/conf.d/redisdb.d/conf.yaml destination. Now restart agent and verify check was discovered and works properly
1
2
3
4
$ sudo service datadog-agent restart # restart agent $ sudo datadog-agent status $ sudo datadog-agent status | grep redis # verify redis check config was loaded $ sudo datadog-agent check redisdb # send check to Datadog manually
Now go to you Datadog dashboard and add new timeseries chart for redis.key.length metric.
Specify error/warning thresholds according to number of workers available. Ideally queue size should not grow at all, so do not set this value higher than 20. Finally you should set up a monitor for the same metric and send notifications to email/messengers when queue is bigger than it should be.
Update for Ansible users
In case you need to add monitoring to multiple instances and you are using Ansible to provision your infrastructure you can add just one task that will automate all the thing for the process above.
Now you can feel a bit relaxed and think about optimizing/refactoring your tasks and scaling infrastructure for workers. Do not forget to add other tools for Celery monitoring such as Flower!
]]><p><img src="/old/article/1614ef4e1efa3faa912a721cdb81c90c.png" alt="queue graphs"></p>
<p>Sometimes your Celery workers are having hard timWriting simple Telegram bot with Telethonhttps://bmwant.link/writing-simple-telegram-bot-with-telethon/2019-12-23T14:09:00.000Z2024-05-08T13:39:43.827ZIn this article I will quickly create a showcase of using Telethon Python library in order to make a simple Telegram bot. Our bot will be a member of a group/channel and once someone changes group’s description bot will post that about information as a separate message.
Preparation
We need a couple of things in order to get started
We can listen to any event that happens in a chat. For example when a title/description has been changed we will receive ChatAction event. In the example below we will listen to any incoming message in the group responding with an updated description. First we need to create a bot instance
1 2 3 4
from telethon.sync import TelegramClient
# make sure you have defined api_id, api_has, bot_token somewhere in the code bot = TelegramClient('bot', API_ID, API_HASH).start(bot_token=BOT_TOKEN)
Once done we need to create a handler responsible of dealing with the specific kind of the events
1 2 3 4 5
from telethon.sync import events
@bot.on(events.NewMessage) asyncdefany_message_arrived_handler(event): print('We are handling message events')
Now let’s run execution loop and add the bot to any test group we already have
1
bot.run_until_disconnected()
You will see logging in your console after any new message arrives into the channel.
Implementing the logic
The one most important thing left is to implement the main application logic
1 2 3 4 5 6 7 8 9 10 11 12 13 14 15
from telethon import functions
DESC = ''
asyncdefany_message_arrived_handler(event): global DESC chat = await event.get_chat() result = await bot(functions.messages.GetFullChatRequest( chat_id=chat.id )) description = result.full_chat.about if description != DESC: DESC = description await bot.send_message( chat.id, f'Description has been changed to **{description}**')
As you can see we store current topic in a global variable, so once process restarts we would loose latest topic. You can use Sqlite to have a simple persistent storage or just write it to the file. The only trick here is to obtain ChatFull instance otherwise we will not be able to get the description.
That’s it, now you are able to enhance it with any custom features you want. Happy coding!