Enhance your developing workflow with notifications on pull requests

How to make your code changes to be delivered faster? How to reduce time your pull requests being in Needs review state? How to ensure developers are not blocked waiting for the feedback from their teammates?
In this article we will write simple tool that integrates with your VCS and your messenger and answers to questions above.
Quick overview
We will be using Python 3/aiohttp/PostgreSQL/Heroku and Github as a platform for our version control system and Slack as a messenger. In a few words the idea is the following: on each opened pull request that is ready to be reviewed developer should assign a proper label (e.g. Needs review) and our application will automatically send a message to a channel/room/chat with a link notifying teammates about action required from their side.
Database setup
The only entity required for our application is the Review.
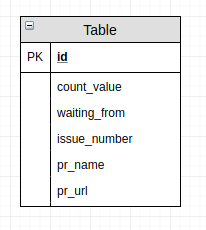
It allows us to implement some additional logic on top of it. Without storing this auxiliary data in our storage we would not be able to count any statistics/repeat notifications/trigger actions based on criteria (e.g. remove label from github page when we already have two approves).
Schema of our database looks like this:
1 | CREATE TABLE IF NOT EXISTS reviews( |
The easiest way to create a PostgreSQL database for this schema is by using docker. It’s ok if you have already installed a database server on your host machine, just provide correct DATABASE_URL value in config later and skip this step.
1 | $ docker volume create pgdata |
This commands will do exactly the following:
- Create volume to persist our database data between container restarts
- Launch container for PostgreSQL database using our volume and officially provided docker image
- Run
psqlscript within the container and create our database through it - Execute initialization script on our database.
Now our database is ready and we can connect to it from python code using aiopg.
1 | import aiopg |
The function above is self-sufficient (we can actually connect aiopg to our aiohttp application and reuse connection pool) and allows us to insert new rows for upcoming reviews. After inserting a record we definitely will need to retrieve it from the database. We need to implement another function but this time small attrs library will assist us. It allows to create objects which values can be accessed via dot notation which is very handy feature for our code. So basically we create a so-called model using this package:
1 | import attr |
It’s the representation of our database table in Python code for easier processing. And another function to retrieve review by its id (we’ll be returning Review object defined above).
1 | async def get_review_by_id(review_id): |
At this point we are ready to implement our main application which will handle all the events. In the simplest form our pipeline should look like this:
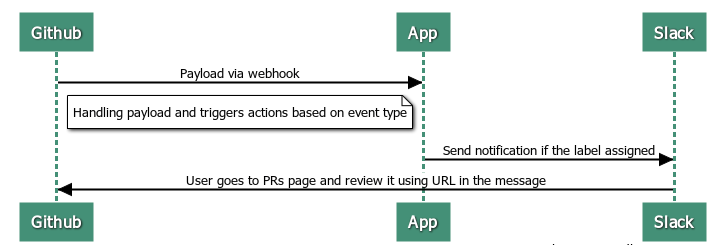
We receive a request from github via webhooks and based on that data decide what to do next. Basically we need to register endpoint in our application
1 | def setup_routes(app): |
and add corresponding dispatcher for each type of the event we want to handle
1 | async def handle_pr_event(request): |
The only thing left is to register our application on Github for it to know where send our events to.
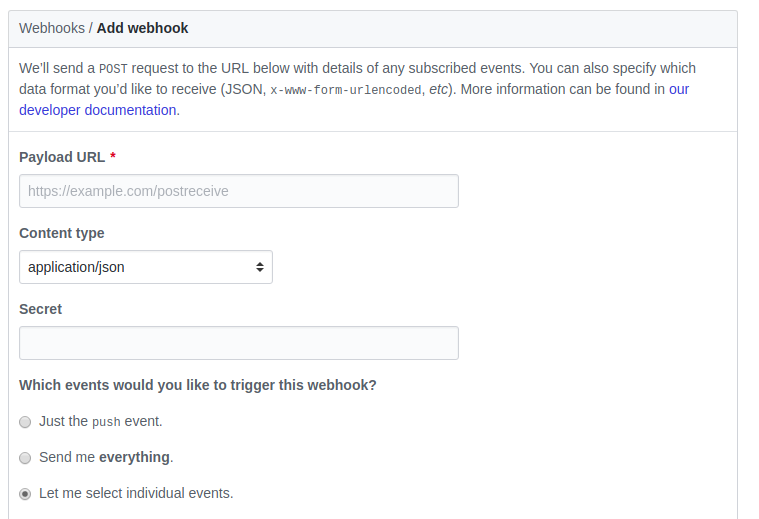
Choose your repository, go to Settings -> Webhooks -> Add webhook and fill the form above. Right now you need to select only Pull requests checkbox but later you can subscribe to any event you want to handle. For Payload URL parameter you need to provide a callback endpoint to your application, so when developing locally you should have your server to be visible to the other machines on the Internet. Very small tool ngrok can help you with that and create a temporary tunnel to your app with a valid domain name you can share with anyone or use for testing purposes as we need right now. Another good idea is to create two webhooks: one for production and one for local development (not to edit callback url each time you switch between versions). Resulting parameter should look like http://b491bdac.ngrok.io/payload.
Integration with messengers
We will cover only Slack integration here but adding another integration is as easy as subclassing from Notifier and implementing your own send_message method. Mostly all the popular messengers provide an api endpoints which you can hit with simple http request allowing to send messages. Basically the only thing you need is to get an access token that proves your application access rights. For Slack you can obtain your token here and save it to the config file. And then we just send our text with additional parameters that allow to customize your resulting message (more on this here). It’s simple POST-request with aiohttp client to the api provided by Slack.
1 | import aiohttp |
You can even reuse this code separately or test message sending like this:
1 | n = Notifier() |
Now let’s assemble all the code together and launch and application (update our main app.py file):
1 | def main(): |
And run it with python app.py or pipenv run python app.py in case you are using pipenv. Feel free to inspect source code of the project (link provided at the end of article) in case you had some issues gluing all the pieces together.
Deploying
The quickest way to deploy your application is to use Heroku platform. It’s free and also provides free postgres addon to connect persistent storage.
After registering and installing Heroku-CLI we will need to do one-time initial setup to configure database and provide secret credentials to our app
1 | $ heroku run "psql \$DATABASE_URL -f init_database.sql" |
The command above is the same database initialization that we did before for our local postgres instance. Now set config variables for production environment via command line or do that via web interface
1 | $ heroku config:set BASE_URL='https://<your-app-name>.herokuapp.com/' |
Our application is all set up and now for the deployment we just need to run $ git push heroku master and repeat that on each update (Heroku will automatically reinstall missing dependencies as well as restart application for you).
The only thing left is to ensure that everything works fine now and you can to that hitting https://<your-app-name>.herokuapp.com in your browser or by checking output from application itself with $ heroku logs.
Obviously the best way to test your app is by adding a label on a pull request and getting a notification in your messenger.


That’s it! Come up with other ideas how to improve this code and make your workflow even better.